Wednesday, April 25, 2012

Spadlers


The armour used by the Knights of St. John of Jerusalem in Malta gradually moved away from the personal armours which were brought by the members to a sort of uniform armour, "loaner armour" if you will.  When the Grand Master demanded that any armour that came to Malta must stay in Malta even if the member was to leave the order, the supply of really pretty gold plated custom made armour suddenly dried up.


Since of course the order was made up of young gentry, fourth sons mainly who were forced into the church even though they preferred the excitement of tournament and the danger of battle, the Order was rather more attractive than so many other paths.  At home they would just get into trouble, in Malta, the Grand Master would find a place and a use for them.  So one could imagine some young tearaway arriving in Valetta with a dozen trunks of clothes, chests of wine, panopolies of armour  and some spending money pressed upon him by indulgent aunts.  The discovery that Jean deValette had forbidden women in the city would have been a great shock, amelorated by the martial tasks he would be put to straight away! 


So the young fellow would learn from experienced knights, be kept out of the worst of the trouble that young scions can get into, kept away from his loser friends, and taught how to handle a galley, deal with slaves, meet Jews, Muslims, and various flavors of Christians, and learn to deal with multiple languages and princes (they were ALL princes) of what can only be described as a United Nations of the time.   Sort of a residential finishing school for Chivalry. 


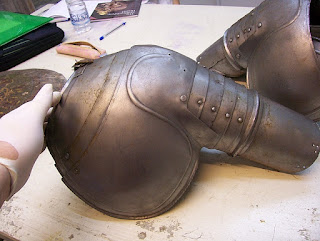
When the young knight would be called back home because his older brothers had been taken out of the picture, the fancy armours stayed behind, and I suspect were probably turned into cash.  Certainly there are very few of them left in the Palace Museum in Malta.  (Though many were given away over the years by various governors) An armoury in Milan started making the armours, so there is a whole regiment of very plain, utilitarian Italian armours lining the corridors to the legislative assembly chambers.  These were even more plain than usual, NEVER had a cod piece, were very roughly made to fit anybody.  To the military eye (like mine), the armours have a very comforting "general issue" feel to them.  Most have battle damage of some kind, all show their age.  As GI as they were, they were all decorated, mobile, light, and did their job.  After all, they WERE made for princes whose parents were often very wealthy.   So the elaborate spadlers I have photographed here are what they wore during the "great seige" and later.  Absolutely stunning, they look good, gleam in the sun in the approved fashion, the edges are roped (which puts them a little later than the great siege).  Check out the gothic arch shape they make in the above picture.  This arch was repeated in the elbows, knees and visor.  And no doubt in the windows behind him. 


The shouder is quite large...it actually uses more steel than the breastplate!  


I personally love the little centre line notch, and the scribed decorative line a quarter inch back from the edge.  One can almost imagine the armour maker wondering how to pretty it up on a budget.  A problem which I have faced many times myself.  


The lower cannons fit neatly into the elbow cops.  This might even be an articulated elbow cop, but very simple floating cops were common as well.  The cannon works perfectly even after all these years.  Look at how much it has been battered, yet the lower cannon rotates smoothly through 360 degrees.  I think the severe shaping required to form the sliding joint is so strong that most battle damage just glances off it. 


From the inside, you can see how they rushed the job.  


And the back gaps open for no reason that I can figure. Don't think I want that scissoring my gambeson back there.


The articulation is from slotted rivets.  The random holes are from when the armour was mounted on an iron frame to be a statue.  (brings tears to my eyes....)  


The rough cut lames (clearly cut with a chisel) that you cannot see contrast sharply with the rolled and roped edgeswhich you can see.  I found it kind of interesting that the person doing the roping did it totally by eye...the irregular spacing of the chisel marks is kind of neat. 


The entire inside is a mass of huge hammer marks.  


 Its okay, the rusty inside is a stabilized rust, and in fact, is more ancient axel grease and soap than actual rust. 

The above collection is of this same spadler from angles you don't normally see them at.  And below is a picture of me, enjoying myself doing all those measurements.

And the question WILL arise...why do I call them Spadlers instead of Spaulders.  The answer is simple....the Oxford English Dictionary calls them Spadlers, and there is NO entry for Spaulder.  What do YOU make of that?

ip-location map zoom

Monday, April 9, 2012

Friday, April 6, 2012

spadler with fence


This German armour from 1530 at the Tower of London Armoury in Leeds is spectacular in its fit and finish, yet fairly straightforward in basic design and funtion. The fairly standard "Italian" style shoulders were now being made in Germany (and German style armours were now being made in Italy...leading to the tremendous confusion. We know this is German because of the radial fluting. Italian armours would be plain, or decorated in bands and panels of detailed etching. When you consider how much work went into fluting this armour, one wonders why the armourer stuck to this overall form instead of coming up with one of his own. My "theory" is that the panel basher who fluted this armour started from a standard off-the-rack set of pieces rather than starting from scratch. Its just a theory though, but it suits my admittedly unstudied concept of guilds and their jealously guarded fields of expertise. (I think this was originally an armour that had been fluted...the bottom of the flutes retain the curve of the original armour)

Anybody who has ever done fluting will tell you that although the fluting is fairly straightforward, you just have to file a stake to the correct shape to allow the shape to be bashed in, at first with a rawhide hammer, and then with a hard hammer, and then lastly with a swage. The hard part of course is to make the flutes straight and even. That would have given the armour maker a few unquiet nights! One unthinking random hit with the hammer, and two weeks down the drain!


If you click on these pictures you can see some interesting battle damage. The lance has clearly torn the fence right through its rivets, and even cracked the corner of the spadler. The three dimentional compound curves have proved to be stronger than the steel they were made from. An interesting engineering study.


The rivets along the edge of the spadler are clearly replacements...likely they held an underlying layer of leather in place to prevent scratches...and as we all know, leather does not have a long lifestyle. This armour then was in use for at least one cycle of leather replacement. Say five or six years. Maybe longer. This closeup (above) also clearly shows the underlying shape of the original armour. Not only did the panel basher make the flutes, but he also kept the underlying gentle swell of the shoulder. This is what makes me think that some guildsman (say a plate maker's guild) decortated an armour made by the harness maker's guild. Again, only speculation. Probably a lot to build upon a gleam of light in the bottom of the flutes...


For some time, the leather was not there to protect the breastplate from the spadler. Those scratches must an annoyed at least one owner! What is interesting is that they have dipped down into the bottoms of the grooves....which means it was a bit of flimsy springy metal dragging across the breastplate at that place. From such evidence are stories developed.


I included this pic because it was a good overview of the nice fence. Gently pointed at the top, beautifully rolled and finished. The centre line which looks so clean and crisp is an illusion however, it is just a reflection of the corner of the display case. This spadler is articulated, but all the articulation is on the helm side of the fence. And the fence is gently curved, but it does NOT follow the fluting. This leads me to another possibly unwarranted assumption....the fence was mounted AFTER the fluting was done. Which means it went back to the harness maker. Maybe not right away. This armour does not usually have a fence, so it might have been a modification. One can almost see the marshal shaking his head and saying..."good lookin' armour m'lord, but we use fences in th' joust now, so you gots t'get fences nailed on hmmm".

And from the side, we see that the fence is surprisingly enough, only on the front half of the spadler. Unless you see the armour from the side or the back, you would never know this! In fact, it does not even come up to the centre line, but rather, a couple of centimeters to the front of the centre line.


ip-location map zoom

Wednesday, April 4, 2012

Building a greave part 3 of 3


The above is the attachment method from 1608. A centre pin, probably with a cotter pin. This is very popular since it allows for some lateral movement. A very useful thing, especially when riding a horse. The downside is that it will scar the blazes out of a gym floor, so is rarely used in re-enactment nowadays.


Above is the way the Dutch do it....keyhole fastenings. But sideways. Don't see THAT every day. Not very common. Note the small hinges on the outside.


The famous "lion armour" in Leeds from the back. You so rarely ever see an armour from the back. You can so clearly see the buckles on the inside (towards the back so that they don't dig into the horse's flank.) The armour is three quarters, open at the inside, with a little flap on the outside for comfort.
A slight variation on this armour....the man who commissioned the Lion Armour did not like articulated sabatons, rather he preferred buskins. Perhaps with fine chain mail over the top of his foot.

This is the same armour from the side. There is so much that is interesting about this armour, but I will confine myself to noting that there is a little articulated plate on the bottom, helping to protect the ankle from lances. My suspicion is that the stirrup has a nice big plate which will protect the top of the foot. It is hard to imagine any other reason why there would be such a glaring opening in the armour.

But I am here to show how the fast way to make those really cool greaves. Up until now, we had quite a lumpy mess. Now we bring in the iron, to iron all those wrinkles out. Enter the English Wheel.
You can do all this work without the wheel, of course. You would have to work it over a flat "burnishing plate" with hammers. A collection of snarling hammers is well worth the trouble if you don't want to use the wheel. However, what can be done in fifteen minutes with a wheel will take you two hours with a snarling iron. (google "snarling iron")


Insert the two inch ball. This is a pretty tight circle, and you don't want to use much pressure or you will track grooves into the work piece.


A few minutes wheeling back and forth will knock down all the high spots.


Leaving you with a rather fat greave. But the centre line is still there, and all you need to do is to fold it on the centre line to narrow it down.


Which I have done in the above picture. But now it is too tight! No problem...


A couple of hits with a hammer on a convenient pipe will pull the calf muscles and foot out. I wrapped a belt around the narrow part to KEEP it narrow while I did this. And forgot to take a picture of that clever little kink.

The last part of the job is to draw the flare. It is in two parts, the first part brings the flare to about forty five degrees, the second is another forty five degrees to make it horizontal to the foot.


The hashing hammer will stretch the metal out neatly, and a round ball pein hammer will flatten out the hash marks.


Check to see if they are the same....

And there they are, ready to mount onto the articulated legs in back. Note that there has been zero sanding or polishing....a polishing job would add to the time.

Elapsed time....about ten or twelve hours for both. Thereabouts. Maybe a bit more for the leathering, which has not been done yet.

If I was to do the back of the leg, we would be looking at about the same amount of time. Not because it is very complicated and more difficult, but rather because I would have to fuss with lining the pieces up, as well as making and installing hinges. These are designed to cover the sides and front of the lower leg. And they do that just fine.


ip-location map zoom

Tuesday, April 3, 2012

Building a greave part 2 of 3


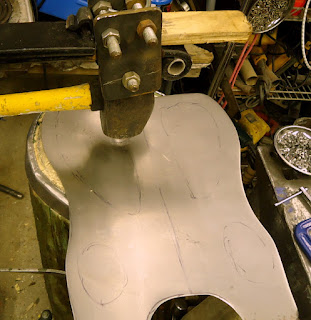
Above is my hammer. It is a helve hammer, and not a particularly big one either. A four pound sledge, rounded and mounted on a leaf spring. The spring is actually not for springy-ness, but just because it has a convenient eye at the back for a pivot. The rope is used to drag the hammer down when I step on the plank at the bottom, and simple bungee cords pull it back up.
I could have made a much heavier hammer, which would do a lot of wonderful work, but hey, this one does the trick. Nice thing about this hammer...I can do it all day, and hardly work up a sweat. The other nice thing about this hammer... it hits in the same spot. Every time. I can let my fingers get pretty close to the moving hammer. (but I don't!) So it is scary accurate.
The stump is an ash log about four feet long, with a ring around the top keeping it from splitting. The ring works. Sort of. The dish was carved out, and would accomodate a 3 inch diameter ball. Its pretty solid. But not perfect...the hollow needs to be re-hollowed every couple of months. Which makes the whole stump a bit shorter each time.


The hammer will use a combination of dishing and raising. Dishing is so easy to do that it is almost always my first choice. I found out that different metals dish vastly differently. For instance, this mild steel will blow outwards by about 5 per cent...two dots ten centimeters apart will become 10.5 centimeters apart when I am done....whereas aluminum will be 11.25 centimeters apart after dishing. (nugget of free information....use it wisely!)


The spaces for the ankle bones has been drawn, and the heads of the calf muscles have been drawn out. Its hammer time!


And after a couple of minutes, the overlapping hammer marks make for a blown out shape. I fold the metal down the length of the shin bone because I know that if I don't do that operation at the beginning, it won't be possible to do it later on!


As you continue to work, the edges will get wrinkles in them. You want this, because you use those wrinkles for a much more important operation....the raising.


Does not look too bad. The centre ridge, the angle bone cover, and the calf muscle have been hammered out to where we want them.


The raising is done with the rounded hammer on the flat board. I just bring a scrap piece of two by four and lay it on top. I have been known to use a hockey puck, but that slips out of place too easily,

Starting at the end of the flute, you hammer it down. The rest of the metal hold it in place, and the metal shrinks. Looks like magic, using a hammer to shrink an edge! But it works.


Flatten the flute neatly.

And then run a line of hammer strikes down each side.


What you get is a lump which has all the features, as wavy and lumpy as they are.

Three quarters view of the same....


Then, using a soft hammer, gently clean up the edges, and define the work better.


ip-location map zoom