Monday, March 31, 2008

Swords


These pictures are of one sword which has taken me a whole week to fix. The bell needed to be totally stripped of nickel plate, dents and scratches sanded away, the incised designs needed to be deepened, and the whole bell was polished, ready for plating. That was a long, but fairly straightforward job. The scabbard is of course, a little more interesting, in that it was badly damaged. We suspect a horse stepped on it. The scabbard is steel, with brass tips, drags, and ring holders.


The above two pictures are of the left side of the sword, and you can see the deep crease, (deep enough to interfear with the sword inside!) and a totally unwarranted scratch in the plating. The nickel has done its job of protecting the steel though....no rust, and because it is harder than the steel, it seems to have shrugged off a lot of abuse. At this stage, I have laid it out on the bench, and am selecting which of the several irons I will have to use to get those deep dents out.


This is the right side of the scabbard. There are two major dents in it, and a lot of wrinkled metal. Sometimes things look less damaged in real life than they look in the photographs, but no...these dents look just as bad when you have them in front of you. The metal in the higher crease, that is, the one closer to the bottom of the picture, is almost bent double.


Here I have placed my tools all together just to give some scale to the job. Tomorrow, I'll post a few pictures of what they look like after the first 20 hours of work to bring these swords back to life.


Saturday, March 29, 2008

Graduation Advanced CS March 08

This is Bill carefully describing the sequence to yet another nasty trick...this one involves pushing the pommel over the shield, and placing it on the opponent's shoulder. The next part is the "step through", as I step to my opponent's right side. The sword will slide around in front. Looks nasty, because it is. The attacker had better step lively though since there are way too many openings in his defence to hang about.


And here we have the fine looking graduating class. Marcus, Jay, Andrew, John, Dan, Karen and Ian.

And me and Shayne in the front of course.


Thursday, March 20, 2008

Graduation Class

click on the image to enlarge.

This was the March 2008 graduation of the Basic Chivalrous Swordhandling class at Algonquin College. A fine group of warriors.

The basic class is a course created by Jean V. and myself, and Shayne D. (on my left) has been "in" on it from the beginning, and this class has had an unprecedented three instructors for every class since. We teach 2 hours per night for 8 nights, the first half is all Kenjuitsu, the second half is all Chivalrous Swordhandling. We have the best "retention" rate of any general interest class, and have graduated well over 500 students in the last few years.

The basic Chivalrous Handling class is a prerequisite for the Advanced Chivalrous swordhandling class, and the advanced Feudal Kenjuitsu class, each of which run at the same time as the Basic classes, but of course, on separate nights. The advanced courses are a bit more techniques intensive, with a lot more drills, and a lot more sparring. The "Basic CS" is a lot more fun...all fundamentals and straightforward techniques, no philosophy, no history. We occassionally bring in armours and swords for a show and tell session, and it provides a perfect introduction to the skill involved in handling a sword.
Note that we don't teach sword "fighting"! The fighting comes within yourself. I don't believe that I can teach you how to fight, but I CAN teach you how to handle the sword with grace and skill, avoiding dangerous muscle and tendon pulls, and how to be light on your feet.


ip-location map zoom

Tuesday, March 18, 2008

The Last Samurai

The back story of "the Last Samurai" (the movie that is) is quite right....the Emperor of Japan, a young and progressive individual wanted to do many things, including modernizing the military. This involved an upset in the status quo which was great fodder for a movie. The part where delegations from Japan went all over the world looking for really good military training cadres is accurate enough....they went to America, Italy, Germany, England, and to France. France was the country they eventually chose to guide their army into the 20th century.


A delegation from Japan arrived in Malta sometime in the middle of the 19th century, and as part of a general gift exchange, the Japanese donated a pair of Samurai armours to the collection in the Palace Armour.


I had seen pictures of the Palace Armoury during the latter half of the 19th century, and the museum was upstairs, in the sunlight, where the members of parliament meet now instead of downstairs in the damp stables, and the samurai armours were proudly displayed along side the Wigancourt Suits and suits of armours from Grand masters and infantry men alike.


World War II had a great effect on a lot of musums all over Europe, and much of the material which was stored upstairs was hastily crated and stored in safe places all over the island. In the general re-building and confusion of the post war period, these samurai suits were overlooked, and to make matters even more difficult, Malta became a republic only 20 years later, and they needed a parliament. The old Imperial Palace was perfect...the Governor General was sent packing, and the armour which had not been unaccoutably given away, or was not needed as statuary was sent downstairs into the stables to form a shadow of the great Palace Armour Musum which existed in the last century. And the process of looking for, and finding bits and pieces of the armours began. Some were in excellent shape. Some were in deplorable shape. But there is still lots of bits and pieces of armours stashed away in people's basements, and some of which has been lost for years.


In the mid '90s, Mr. S, the curator found these Samurai Suits, and was aghast at the damage which half a century of poor storage had done to them. All that is left are one helmet, and the fragments of the armour you see in the pictures above. It is actually not quite as bad as it looks, clearly the silk is crumbling (it would have done that even in good storage conditions) and the neat hexagonal silk sewn plates are as delicate as can be. Rust has penetrated the protective paint, causing it to bubble and blow off the thick patterned lacquer.

I won't talk about each of these pieces in detail, rather, I suggest you click on the pictures, enlarge them, and perhaps think of this as a sort of "grey's anatomy" of the japanese armour making craft.

ip-location map zoom

Tuesday, March 11, 2008

Ron B. helm

Nice simple Viking helm. I used old steel, which looks IMHO kind of antique-ish. I like the effect. The template is a standard one I have used for years, and normally the occulars project outward more than this. Without the fancy shaping then, the corners stick up like horns. A horned Viking helmet at last? Nah...thats just the way it turned out. Its got me thinking though of making the sides into wings maybe. Why not...I have deviated from "period" plenty already.


I fire coloured the skull....it came out this nice deep rich blue colour. In the sunlight, it is VERY striking.


Not much to see here on the inside, except of course for the welding. This was made by cutting the bowl in half, and welding each half together. One thing is sure, this is a very strong helm. You can see the thickness of the steel really well in this picture.


Once upon a time, the top had a bead of weld on it just like the underside. A lot of judicious use with the side grinder, and it all ends up coming up smooth. In fact, you have to turn it over to see that it has been welded. And no, this is NOT my welding...this was a professional up the road that welded that. I just grind the weld nice and clean and flat, and look for voids.


And a nice shot of this armour from the top quarter.

I am not quite sure yet how to finish this armour. It is a real helmet...that is, it is strong enough to soak up a hit from a baseball bat without denting, but it might yet need some flaring at the base of his neck, and maybe some chain maile hanging from the occular (spectacle looking mask) Hanging chain mail will mean lots and lots of little evenly spaced holes in the occular, so I made it nice and wide on purpose.


ip-location map zoom

Tuesday, March 4, 2008

Paul Hackett's Helm

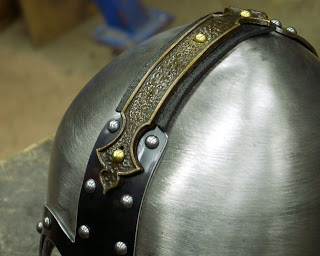
click on the images to enlarge. This is Paul Hackett's helm....a little bit customized, but still, pretty much simple and straightforward. It uses a standard spun top which I sanded clean, cut in half, re-shaped, then applied some decorative pieces.
As you can see, it comes in neatly at the sides, but still has plenty of space front and back. Some people have called me on the use of spinnings. All I can say is "Dude! These things are TEN Gauge! You don't pay me enough to bash 10ga. out by hand!!!
Besides, spinnings are perfectly period. The Sutton Hoo helm is built on a spinning. One could say all the Sutton Hoo helm is decoration applied to a spinning!


And a couple of close ups of the applied bronze piece which fits so neatly on top!
I think it is a decorative bronze for a door way. Oh well, recycling at its best. This cute little bronze piece has been kicking around the shop for a couple of years now, just waiting for Paul to take it home.

What you "don't" see is the leather suspension system I put into this helmet. I was anxious to get pictures while there was still some natural light, and gosh, its not like there is much to see inside anyway. A leather suspension system. With a little lace at the top to provide adjustment.


ip-location map zoom