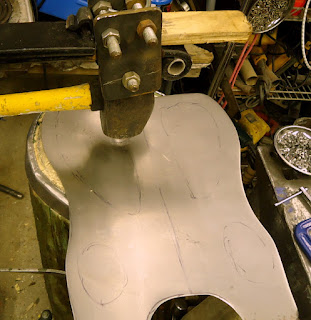
Above is my hammer. It is a helve hammer, and not a particularly big one either. A four pound sledge, rounded and mounted on a leaf spring. The spring is actually not for springy-ness, but just because it has a convenient eye at the back for a pivot. The rope is used to drag the hammer down when I step on the plank at the bottom, and simple bungee cords pull it back up.
I could have made a much heavier hammer, which would do a lot of wonderful work, but hey, this one does the trick. Nice thing about this hammer...I can do it all day, and hardly work up a sweat. The other nice thing about this hammer... it hits in the same spot. Every time. I can let my fingers get pretty close to the moving hammer. (but I don't!) So it is scary accurate.
The stump is an ash log about four feet long, with a ring around the top keeping it from splitting. The ring works. Sort of. The dish was carved out, and would accomodate a 3 inch diameter ball. Its pretty solid. But not perfect...the hollow needs to be re-hollowed every couple of months. Which makes the whole stump a bit shorter each time.

The hammer will use a combination of dishing and raising. Dishing is so easy to do that it is almost always my first choice. I found out that different metals dish vastly differently. For instance, this mild steel will blow outwards by about 5 per cent...two dots ten centimeters apart will become 10.5 centimeters apart when I am done....whereas aluminum will be 11.25 centimeters apart after dishing. (nugget of free information....use it wisely!)

The spaces for the ankle bones has been drawn, and the heads of the calf muscles have been drawn out. Its hammer time!

And after a couple of minutes, the overlapping hammer marks make for a blown out shape. I fold the metal down the length of the shin bone because I know that if I don't do that operation at the beginning, it won't be possible to do it later on!

As you continue to work, the edges will get wrinkles in them. You want this, because you use those wrinkles for a much more important operation....the raising.

Does not look too bad. The centre ridge, the angle bone cover, and the calf muscle have been hammered out to where we want them.

The raising is done with the rounded hammer on the flat board. I just bring a scrap piece of two by four and lay it on top. I have been known to use a hockey puck, but that slips out of place too easily,
 Starting at the end of the flute, you hammer it down. The rest of the metal hold it in place, and the metal shrinks. Looks like magic, using a hammer to shrink an edge! But it works.
Flatten the flute neatly.
 And then run a line of hammer strikes down each side.
What you get is a lump which has all the features, as wavy and lumpy as they are.
 Three quarters view of the same....
Then, using a soft hammer, gently clean up the edges, and define the work better.

1 comment:
Nice work Stag, I must admit for forging armour putting in the intial ankle roundings first just makes sense. Cute little helve hammer. I'm currently redesigning a treadle and an air hammer to go in a mobile workshop for armouring and weapon forging. I look forward to seeing your finished work. regards Greg
Post a Comment